Apple has given most secure screen lock finger prints / Face ID, but when it comes to lock individual apps Apple does not give much leverage to third party apps due to security reasons.On many occasions someone we know from our relatives or friends ask to use our devices for a particular application, and you cannot resist giving then comes the need of App Lock feature.
There are two methods inbuilt in Apple IOS to serve this purpose, first one is Guided Access and second is Screen Time.
Guide Access
First of all navigate to Accessibility in settings then select Guided Access and turn this ON after that set password for guided access.
Triple click top button to start Guided Access, you can start this for any application. After enabling this setting users will be restricted to the app on which Guides Access was started.
To stop guided Access double click top button to unlock with Face ID and triple click to unlock with password.
Screen Time
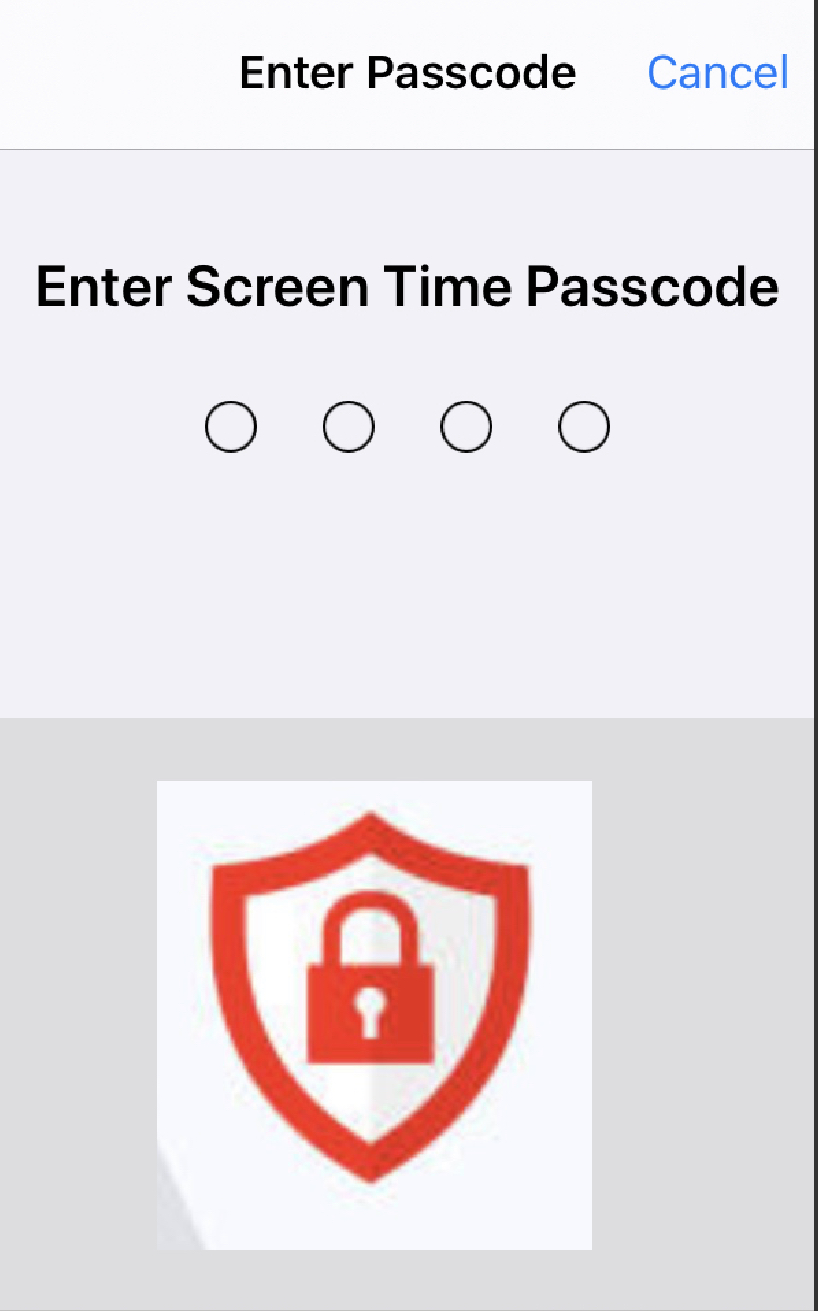
Apple IOS settings have a feature ‘screen time’ using this you can lock any app you want without installing any third party applications.
Step by Step Guide to Lock Apps
Go to settings > Screen time
First Step
First click on ‘App Limits’ and then select apps that you want to lock or limit access. After selecting apps set time to the minimum possible value, at this time 1 minute is the minimum time you can select.
Second Step
In this step you have to setup lock password, set a four digit numerical password. Here you will have to provide your Apple ID and password for recovery option.
Although these settings does not work exactly as an App Lock but even though you can use it as an App Lock.
Google Drive is one of the most popular cloud storage platforms, widely used by people across the globe. It provides 15 GB of free cloud storage to registered users, allowing them to store a variety of data such as media files, images, PDFs, and more.
Google Drive’s 15 GB storage is shared across other Google services, including Gmail and Google Photos. However, in Google Photos, if you upload photos under the ‘High Quality (unlimited storage)’ option, these uploads won’t count against your 15 GB limit.
Benefits of Storing Files in the Cloud
• Data Security: Your files remain safe even if you lose your local storage device.
• Accessibility: You can access your files from anywhere in the world by logging into your Google account, with world-class security provided by Google.
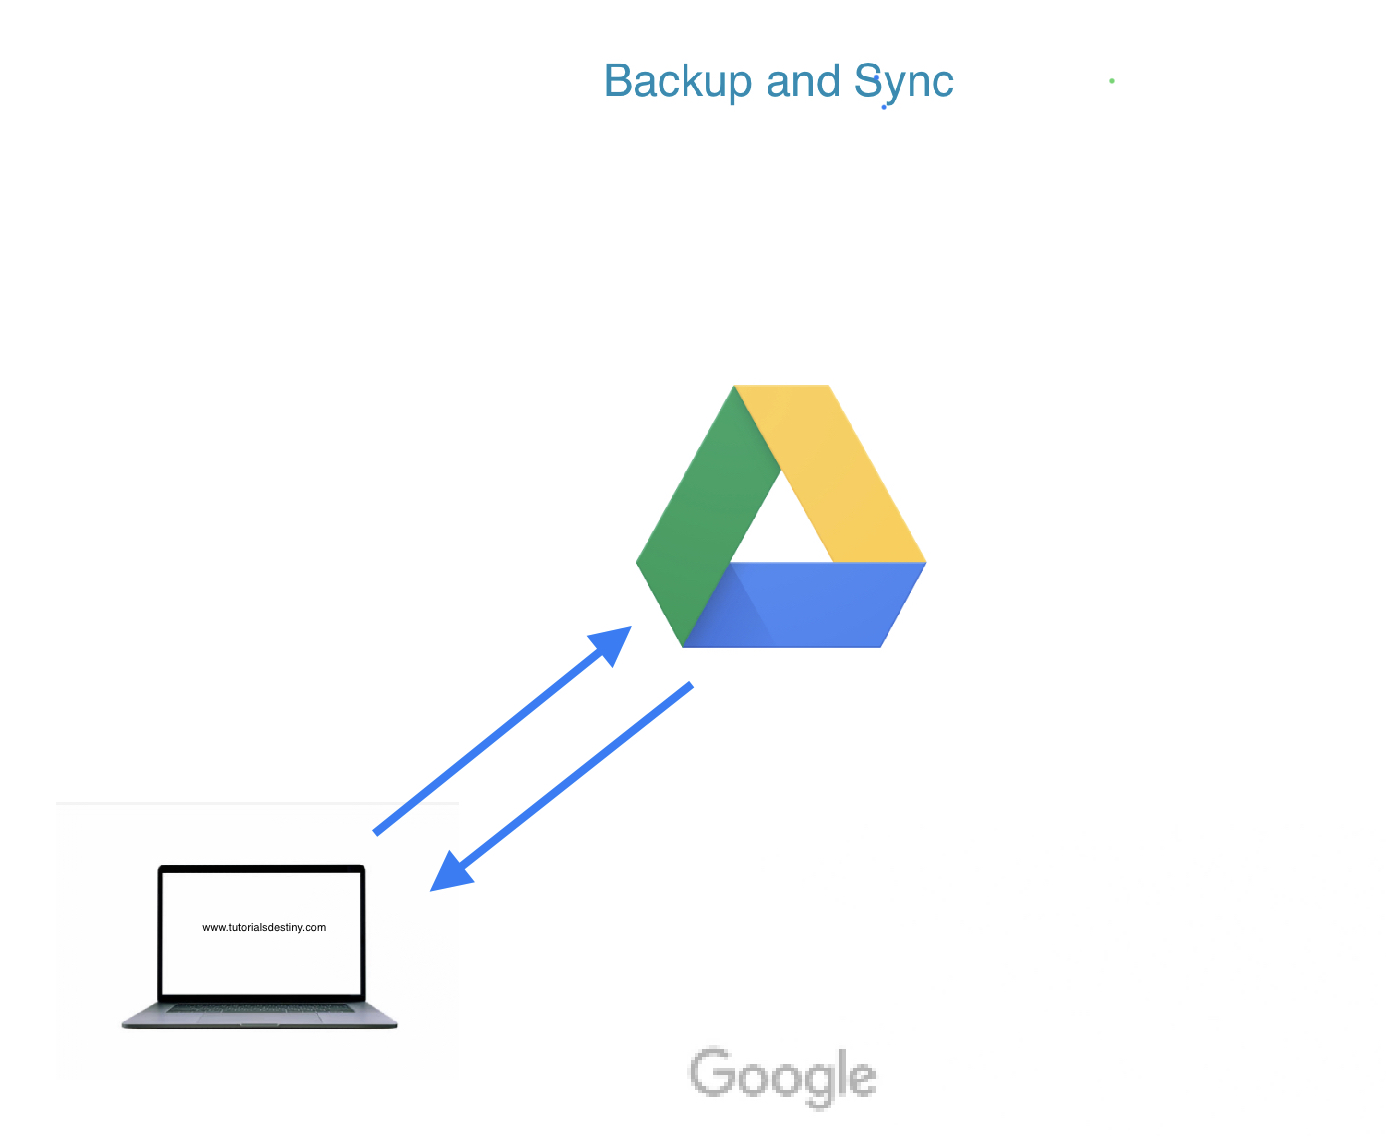
How to Sync Google Drive With Your Computer ?
If you’re using Google Drive as your primary cloud storage, having a local offline copy of your Drive folders on your computer can provide additional security and enable easy file access across multiple devices.
Here’s how to sync Google Drive with your computer:
Step 1: Download and Install Backup and Sync
First, download Google’s Backup and Sync application from the official website:
Once downloaded, install the application on your computer.
Step 2: Log In to Your Google Account
After installation, log in to the Google account associated with your Drive.
Step 3: Set Up Computer Folder Backup
In this step, you can select the folders on your computer that you want to back up to Google Drive.
• If you’re using the free 15 GB plan, avoid selecting large folders to prevent running out of storage.
• For photos and videos, choose:
High Quality (Unlimited Storage): This option does not count against your free 15 GB storage.
Original Quality: This option will use your Drive storage, so it’s suitable if you have purchased additional storage.
Step 4: Set Up Google Drive Sync Preferences
Here, you can choose whether to sync all files from your Google Drive or only specific folders to your computer.
Once your preferences are set, click OK to complete the setup. Now, your Google Drive and computer will seamlessly sync.
Managing Sync Settings
If you wish to change your settings later:
1. Open the Backup and Sync application by searching for it on your computer.
2. Update your backup and sync preferences as needed.
Upgrading Google Drive Storage
If you need more storage space, you can upgrade your plan. Visit Google One to explore available storage plans.
Conclusion
Syncing Google Drive with your computer ensures your files are backed up, easily accessible, and safe. Whether you’re using the free plan or a paid one, Google Drive provides a secure and reliable way to store your important files both locally and in the cloud.
When it comes to security and privacy Telegram is far far better than its competitors.
Self destructing messages is one of exclusive features available on Telegram which make it different from other messaging apps. This feature enables chat with full safety and security messages which you send are auto deleted after a pre-specified time or you can say self-destruct.
How To Send Self Destructing Messages
First select the contact you want to send self destructing messages then on the top right corner select the profile photo.
After that select more and then select ‘Start Secret Chat’ a new secret chat window will open up for the selected contact.
Now at the bottom in the message box there is a timer symbol click on that and set the time for self destruction of the messages.
In the above picture you can see that highlighted line saying “you set the self-destruct timer to 1 second”. Now any message sent or received in this secret chat window will be auto deleted after 01 second. You can select your own time also you can turn off the timer from the selection window. Also note that this self destructing feature will be applied to both sent and received messages.
If the receiver tries to take screenshots it will be notified in the chat window.
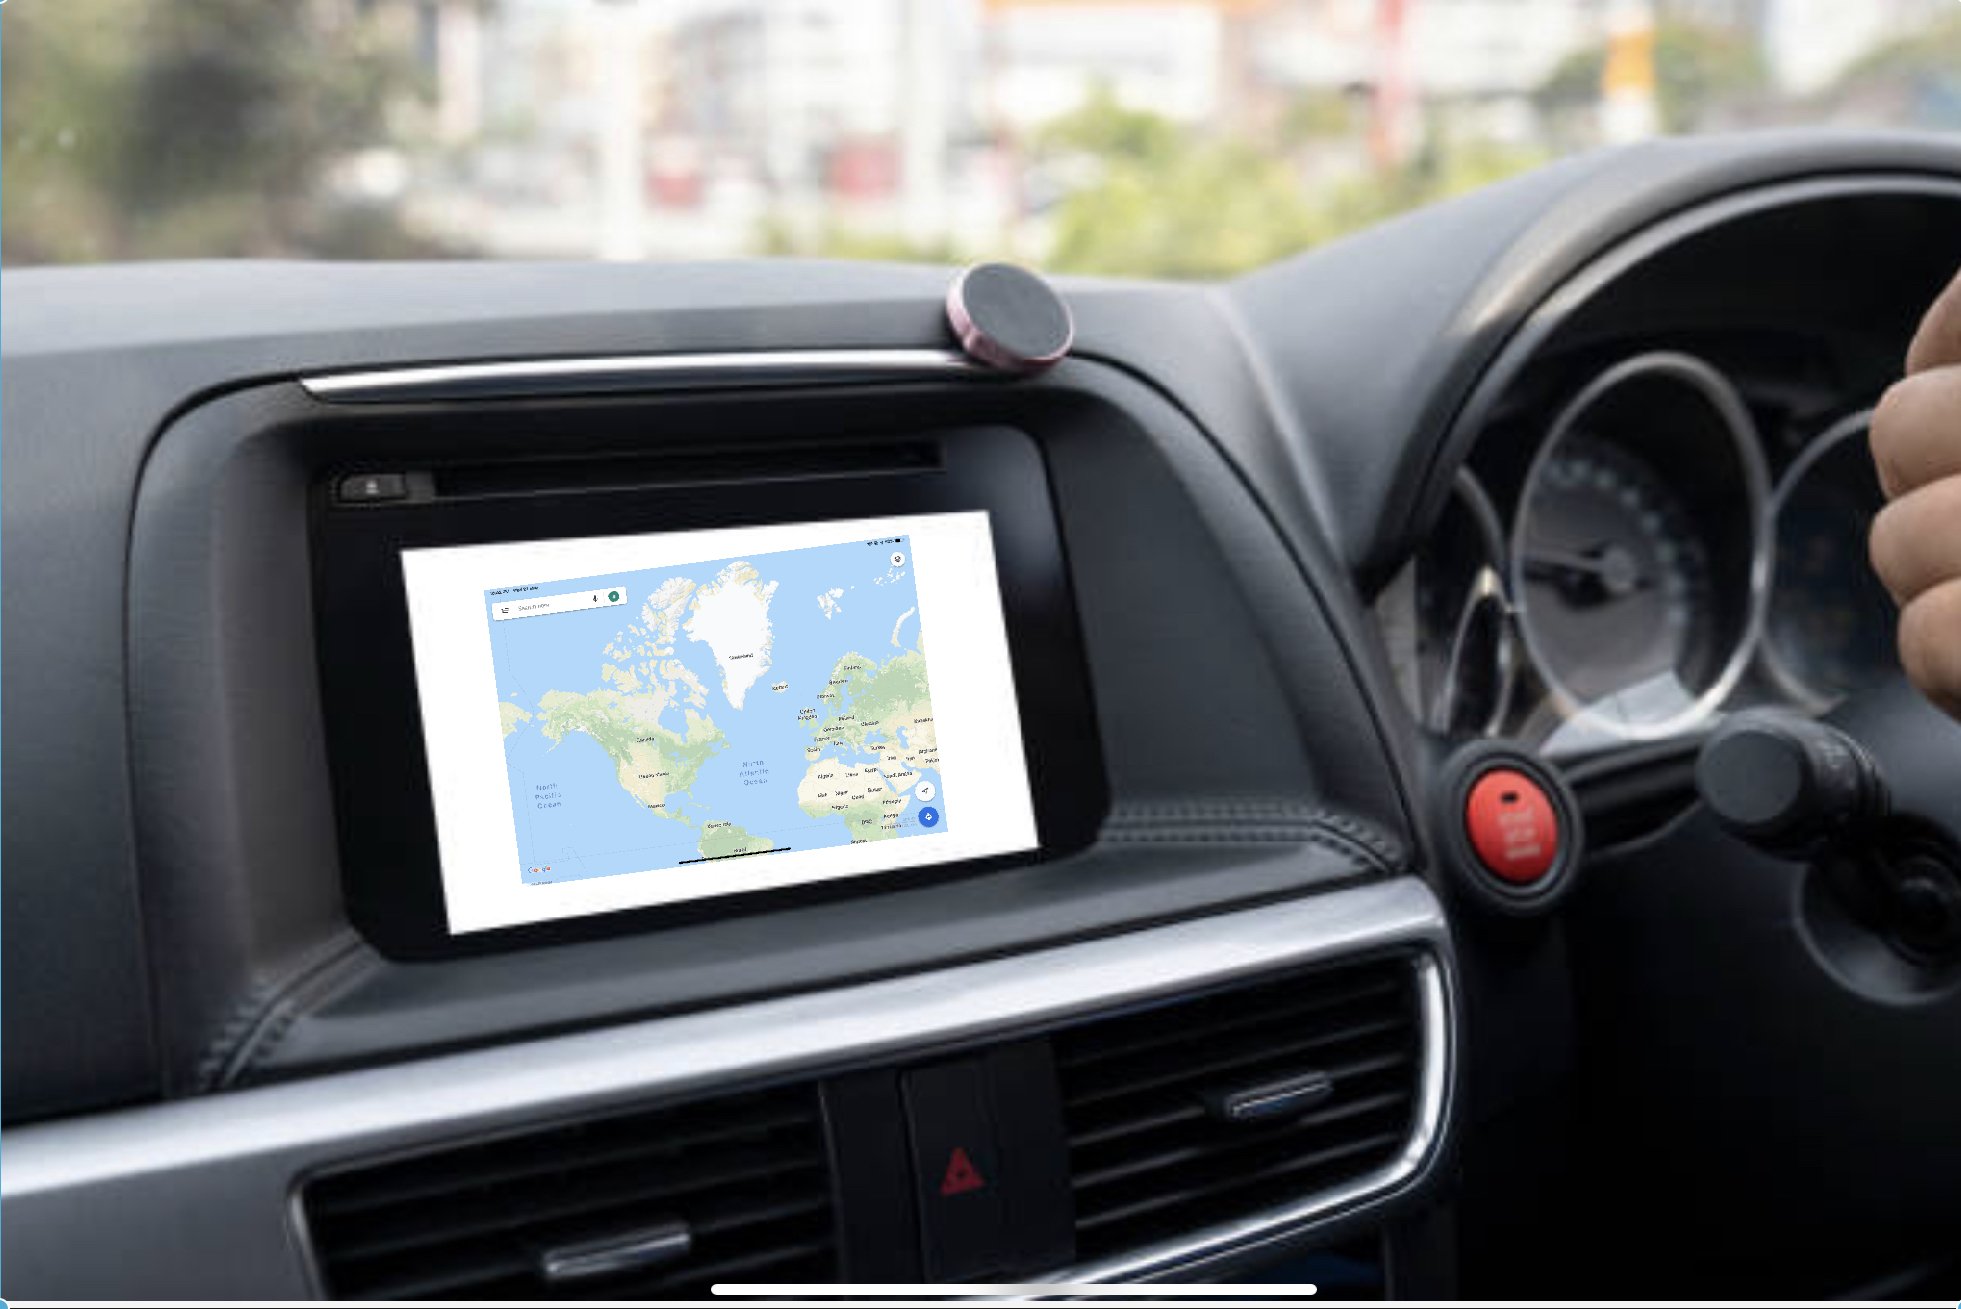
Google map is the most popular navigation service widely used across the Globe, there are other navigation services also like waze, Apple map, Bing map and many more but Google map is the best of all.
Google maps provides a variety of features that you need to know for better navigation experience.
Here, I will explain them step by step.
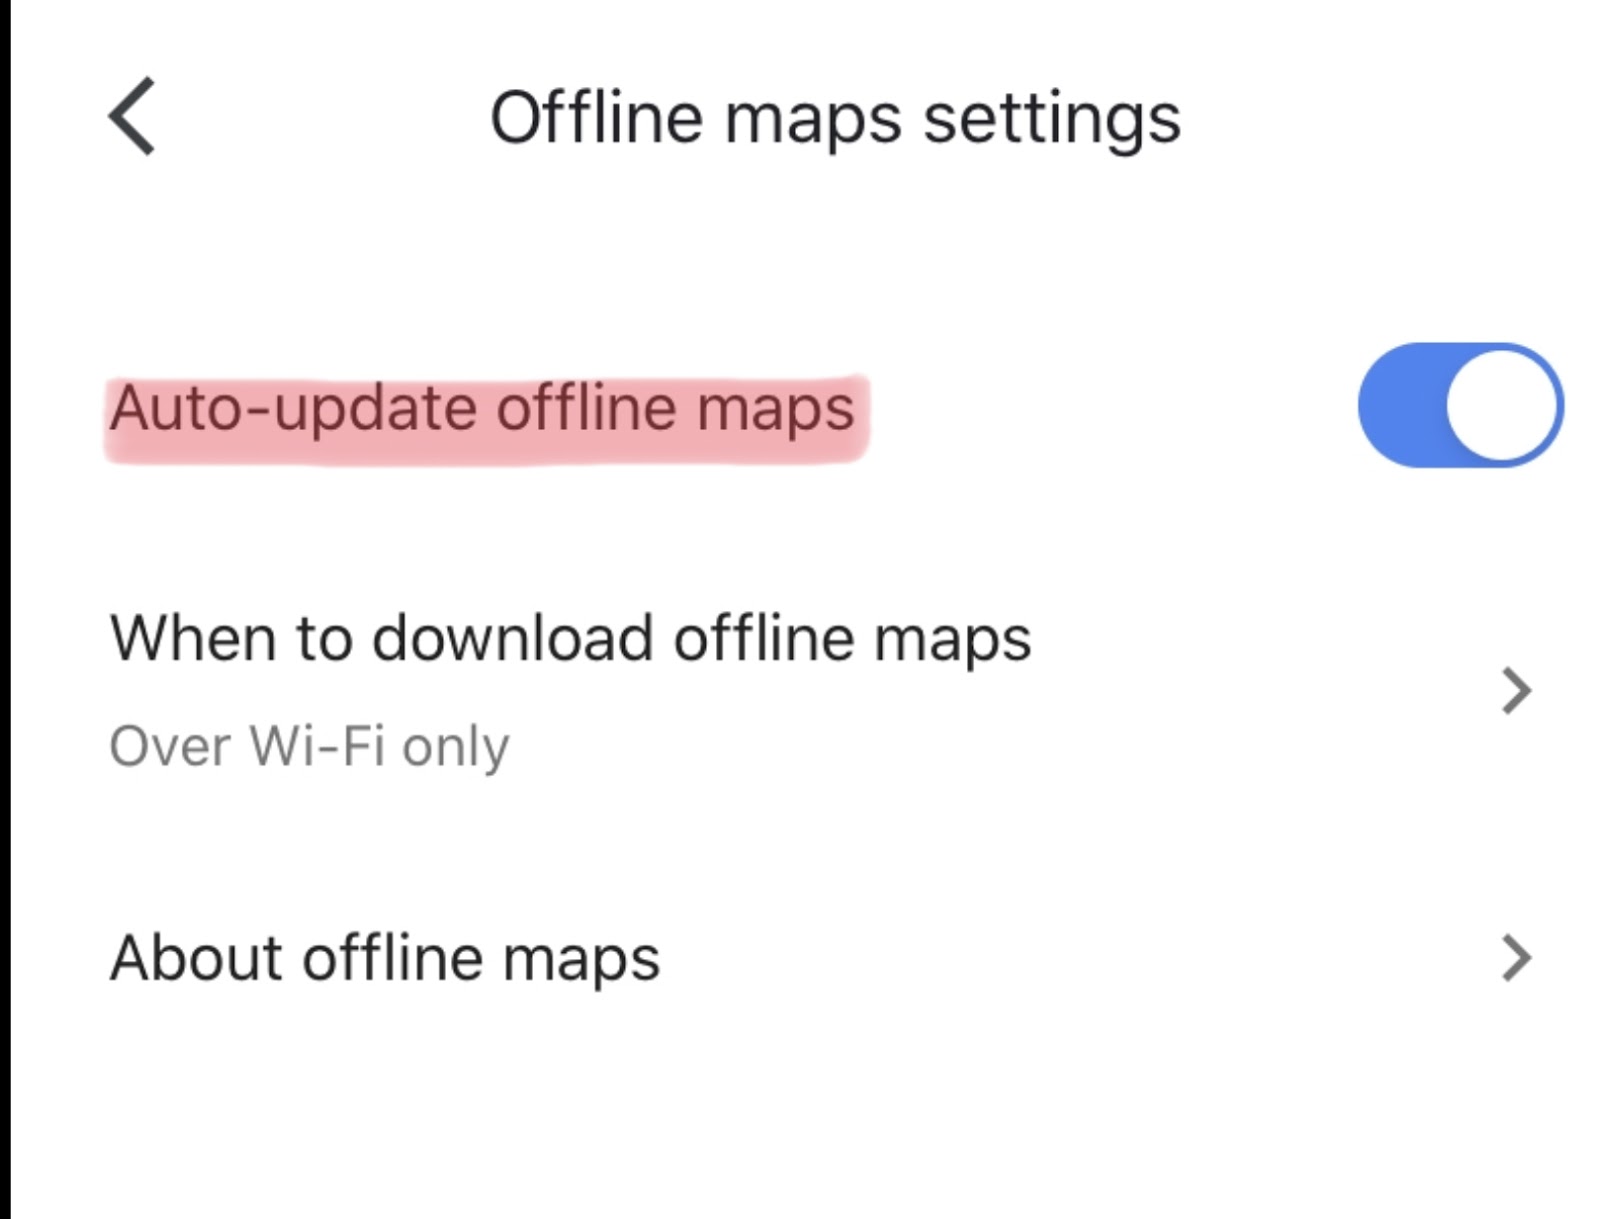
Offline Maps
Offline maps gives you navigational assistance even if you are not connected to any network, like in remote areas where cellular network is not available.
You can use this offline maps feature for accurate guidance.
For this, you have to download the selected area map on your device memory while in network.
Select menu on the top of Google maps and then select Offline Maps and then click on ‘Custom Maps’
Now you have to select the desired area to be downloaded for offline use.
This downloaded Offline Map expires after a certain time so you must enable
‘Auto-update offline maps’
Incognito Mode
You must be familiar with Incognito Mode in Google Chrome Brouwer so now Google maps is also providing Incognito mode.
After enabling this mode Your navigation data, search history, followed routes will not be stored for personalised experience you will be totally out of grid.
You can turn on Incognito mode from the menu bar.
After you are done with incognito mode again you may turn it off.
Type Of Maps
This Function allows you to switch between different type of map formats available
Default View
Satellite View
Terrain View
In satellite view all building structures, rivers, lakes, mountains will be visible in real view but it will not be a real time view.
Location Sharing
Now on Google Maps You can share your Real Time location with your gmail contacts, you can select contacts you want to share with, time duration for which your contacts will be able to track your real time location.
Also you can turn off location sharing any time in between.
Time selection for location sharing have number of options like for a ‘Specific time’ or ‘Until you turn this off’
Add Stop
Google Maps facilitate to add stop in between your source poin and the destination point. You can add upto nine stops throughout your route before starting navigation.
Here in the below picture, there is a brief instruction of how to add stops
We will keep you informed as soon as latest features arrives
In today’s digital world, almost every website asks for your email address. Whether you want to download an eBook, register for a webinar, access free tools, post a comment, or simply browse certain content, the first requirement is often your email ID. While this may seem harmless, sharing your primary email address everywhere can expose you to unnecessary risks.
From spam messages and promotional overload to phishing attempts and malware links, your inbox can quickly become cluttered and unsafe. This is where disposable email IDs come into play. Using a temporary or burner email address can help you maintain privacy, reduce spam, and stay protected from various cyber threats.
In this detailed guide, we will explore why you should avoid using your original email ID for random registrations and how disposable email services like Guerrilla Mail, 10 Minute Mail, and Temp Mail can help you stay secure online.
Why You Should Avoid Using Your Primary Email Everywhere
Your primary email address is often linked to many important accounts—banking, social media, cloud storage, educational platforms, and work-related services. If this email address falls into the wrong hands, the consequences can be serious.
Let’s look at some common risks:
1. Spam Overload
Once you enter your email ID on a website, you may start receiving promotional emails. Even if the website itself is legitimate, your email might be shared with third-party advertisers. Over time, your inbox becomes filled with newsletters, offers, and irrelevant marketing emails.
2. Phishing Attacks
Cybercriminals frequently use email as a tool for phishing. They send fake emails that appear to come from trusted companies, tricking users into clicking malicious links or revealing personal information.
3. Data Breaches
Many websites store user data. If a website suffers a data breach, your email ID may be leaked or sold on the dark web. Hackers often use leaked emails to attempt password resets or targeted attacks.
4. Malware Distribution
Spam emails may contain attachments or links that install harmful software on your device. This can lead to identity theft, data loss, or system damage.
5. Loss of Privacy
When your main email ID is linked to multiple services, it becomes easier for companies to track your online activities and build a data profile about you.
Because of these risks, it is not advisable to use your original email ID for every random registration or one-time sign-up.
What Is a Disposable Email ID?
A disposable email ID, also known as a temporary or burner email address, is an email address that you can use for a short period of time. It allows you to:
Receive emails
Send emails (in some services)
Complete registrations
Verify accounts
The key feature is that the email address automatically expires after a certain time or can be discarded whenever you want. This ensures your real email ID remains private and protected.
When Should You Use a Disposable Email?
Disposable email services are useful in many situations, such as:
Signing up for a website you are not sure about
Downloading free resources
Testing a service
Accessing trial offers
Participating in online forums
Avoiding marketing emails
However, you should not use disposable email IDs for:
Banking services
Government portals
Important business accounts
Educational platforms where long-term access is needed
Disposable emails are best suited for temporary or low-risk interactions.
Best Disposable Email Services
There are many free and paid temporary email providers available online. Below are some popular and reliable options.
1. Guerrilla Mail
Guerrilla Mail is one of the most well-known disposable email services available today. It is powered by an open-source project and is completely free to use.
Key Features:
No registration required
No personal information needed
Instant temporary email generation
Option to send and receive emails
Email address can be customized
Messages are automatically deleted after a certain time
You do not need to provide your real email ID, phone number, or any personal details. Simply visit the website, and a temporary email address will be generated automatically.
This service is especially useful when you need to verify an account quickly but do not want to expose your primary email address.
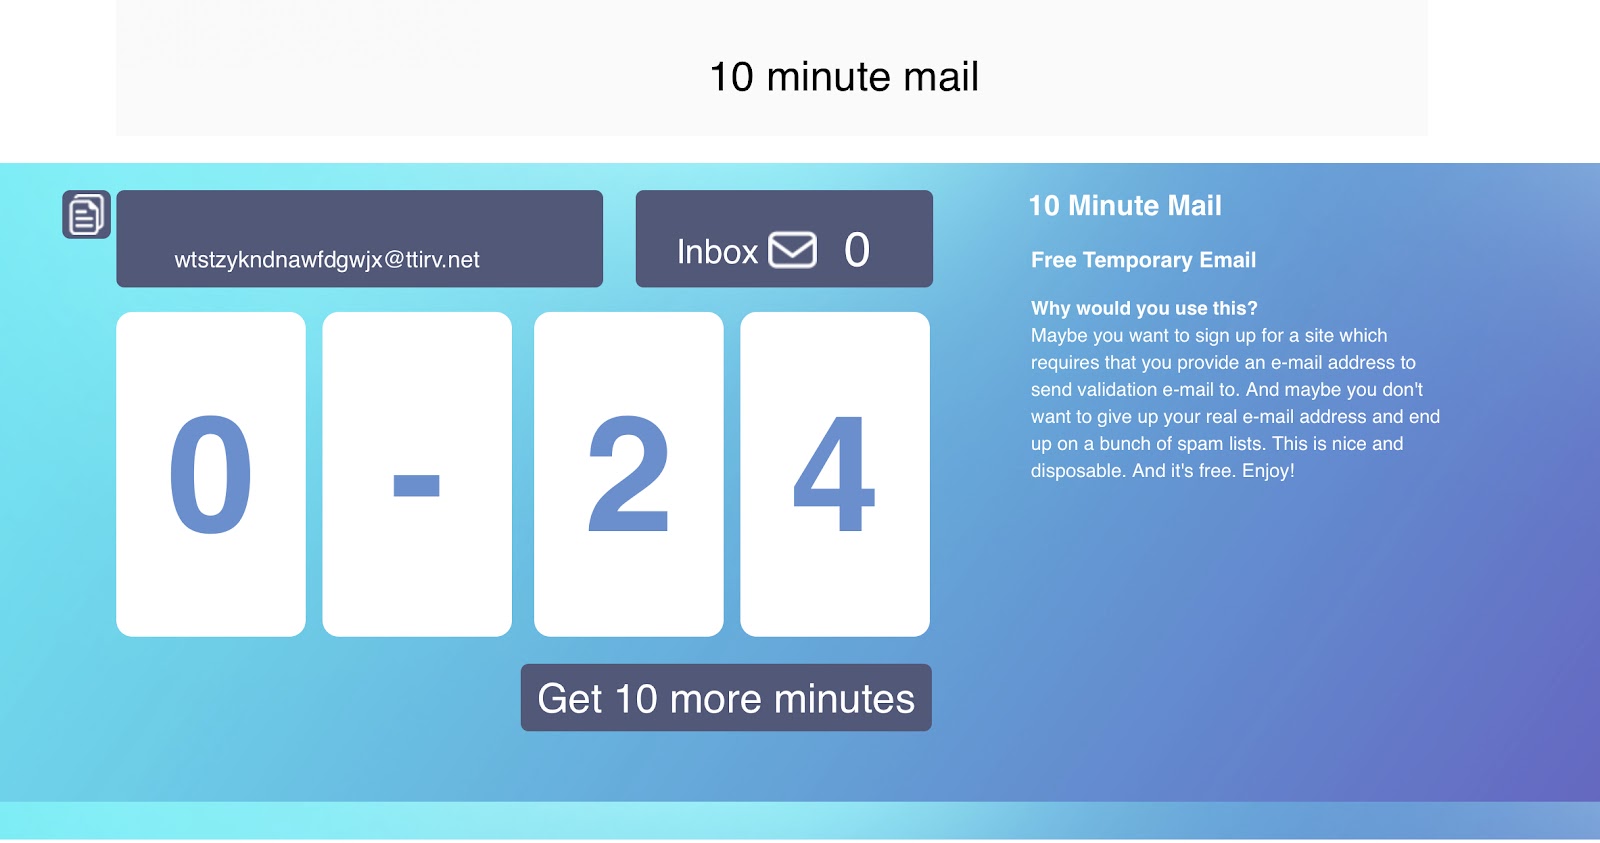
2. 10 Minute Mail
As the name suggests, 10 Minute Mail provides a temporary email address that expires in 10 minutes. It is simple, fast, and user-friendly.
How It Works:
Open your browser.
Visit the 10 Minute Mail website.
A temporary email address is automatically generated.
Use it for registration or email verification.
After 10 minutes, the email address automatically expires. In some cases, you can extend the time if needed.
Benefits:
No sign-up required
Instant email generation
Auto-expiry for extra security
Easy-to-use interface
This service is ideal for quick, one-time verifications.
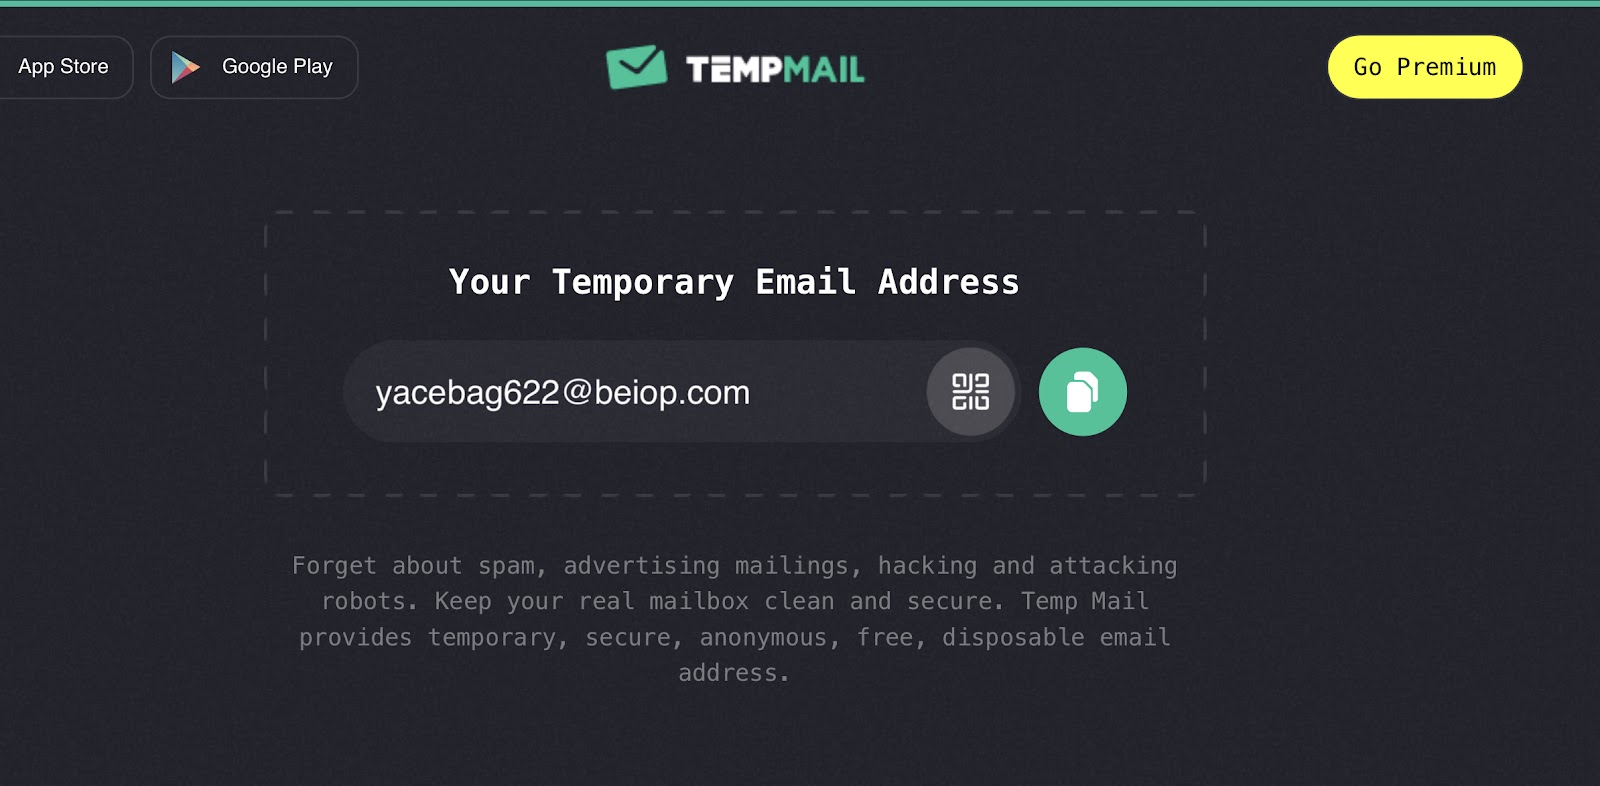
3. Temp Mail
Temp Mail is another popular disposable email provider that offers temporary email addresses in just one click.
Features:
Instant email address creation
No registration needed
Mobile-friendly interface
Free to use
Works for verification emails
It provides a clean interface and is widely used for short-term registrations and trial access.
Free vs Paid Disposable Email Services
While most disposable email services are free, some providers offer premium versions with additional features such as:
Custom domain names
Longer email retention
Multiple inboxes
Ad-free experience
Free versions are generally sufficient for basic use. However, if you require advanced privacy features, a paid option may be beneficial.
Advantages of Using Disposable Email IDs
Let’s summarize the main benefits:
1. Spam Protection
Your main inbox remains clean and organized.
2. Privacy Protection
Your original email address stays confidential.
3. Reduced Risk of Cyber Attacks
Even if the temporary email is compromised, your primary email remains safe.
4. Quick and Easy Access
No need for lengthy sign-ups or identity verification.
5. Better Inbox Management
You can control which services get access to your real email address.
Limitations of Disposable Emails
While disposable emails are helpful, they do have some limitations:
Some websites block temporary email domains.
Emails are deleted after a short time.
Not suitable for long-term communication.
Limited storage and features.
Therefore, they should be used wisely and only for temporary purposes.
Modern Disposable & Privacy-Focused Email Services
Over time, more advanced and privacy-focused email solutionhave emerged. These are not just temporary inboxes — they are full privacy tools.
Proton Mail now offers an advanced email alias feature called “Hide My Email.”
Why It Stands Out:
End-to-end encryption
Privacy-first infrastructure
Email masking feature
Swiss-based privacy laws
It combines secure email with disposable alias functionality.
Temporary Email vs Email Aliasing – What’s the Difference?
There are two main types of disposable solutions today:
1. Pure Temporary Email (Short-Term)
Expires automatically
Inbox deleted after some time
No recovery option
Best for quick use
Examples:
Guerrilla Mail
10 Minute Mail
Temp Mail
2. Email Aliasing (Long-Term Control)
Forwards to your real inbox
Can be turned off anytime
Better for subscription control
More professional
Examples:
SimpleLogin
AnonAddy
Firefox Relay
Proton Mail aliases
If you run a blog or online business, aliasing is usually a better long-term solution.
Why Disposable Emails Are More Relevant Now
Several trends have made disposable emails even more important:
1. Aggressive Data Collection
Companies now collect user behavior data across multiple platforms.
2. AI-Based Spam Campaigns
Spam emails are now more personalized and harder to detect.
3. Data Leaks Are Common
Even trusted websites have suffered breaches.
4. Increased Phishing Sophistication
Emails now mimic real brands perfectly.
Because of this, many privacy-conscious users now maintain:
One primary email (banking & important accounts)
One secondary email (shopping & subscriptions)
Multiple disposable aliases (for random signups)
Best Practices for Online Email Safety
Using a disposable email is a smart step, but you can further improve your email security by following these best practices:
Use strong and unique passwords.
Enable two-factor authentication (2FA).
Avoid clicking suspicious links.
Regularly update your software and antivirus.
Do not share personal information unnecessarily.
By combining these habits with disposable email usage, you significantly reduce your exposure to cyber threats.
Final Thoughts
In an era where data privacy is becoming increasingly important, protecting your primary email address is essential. Sharing your original email ID with every website can lead to spam, phishing attacks, and data breaches.
Disposable email services like Guerrilla Mail, 10 Minute Mail, and Temp Mail provide a simple yet effective solution. They allow you to register, verify, and access online services without risking your personal inbox.
There are many free and paid temporary email services available across the web that provide burner email addresses. Choosing the right one depends on your needs—whether you require quick verification or slightly longer temporary access.
By making disposable email IDs a part of your digital safety strategy, you can maintain privacy, reduce spam, and enjoy a safer online experience.
Protect your inbox. Protect your identity. Use disposable emails wisely.
Kali Linux is one of the most popular Linux operating system in the world of penetration testers. It comes pre equipped with a lots of useful penetration tools.
Back from its “Backtrack” days it has gain more popularity also.
Benefit of making a kali Linux Live USB is that you can carry you pen testing tool kit with you wherever you go and while doing forensic it also prevent you from mixing up with your target machine.
Boot into an window OS, Download and install an Etcher application.
Plug in your USB drive of at least 8 GB memory.
Run Etcher
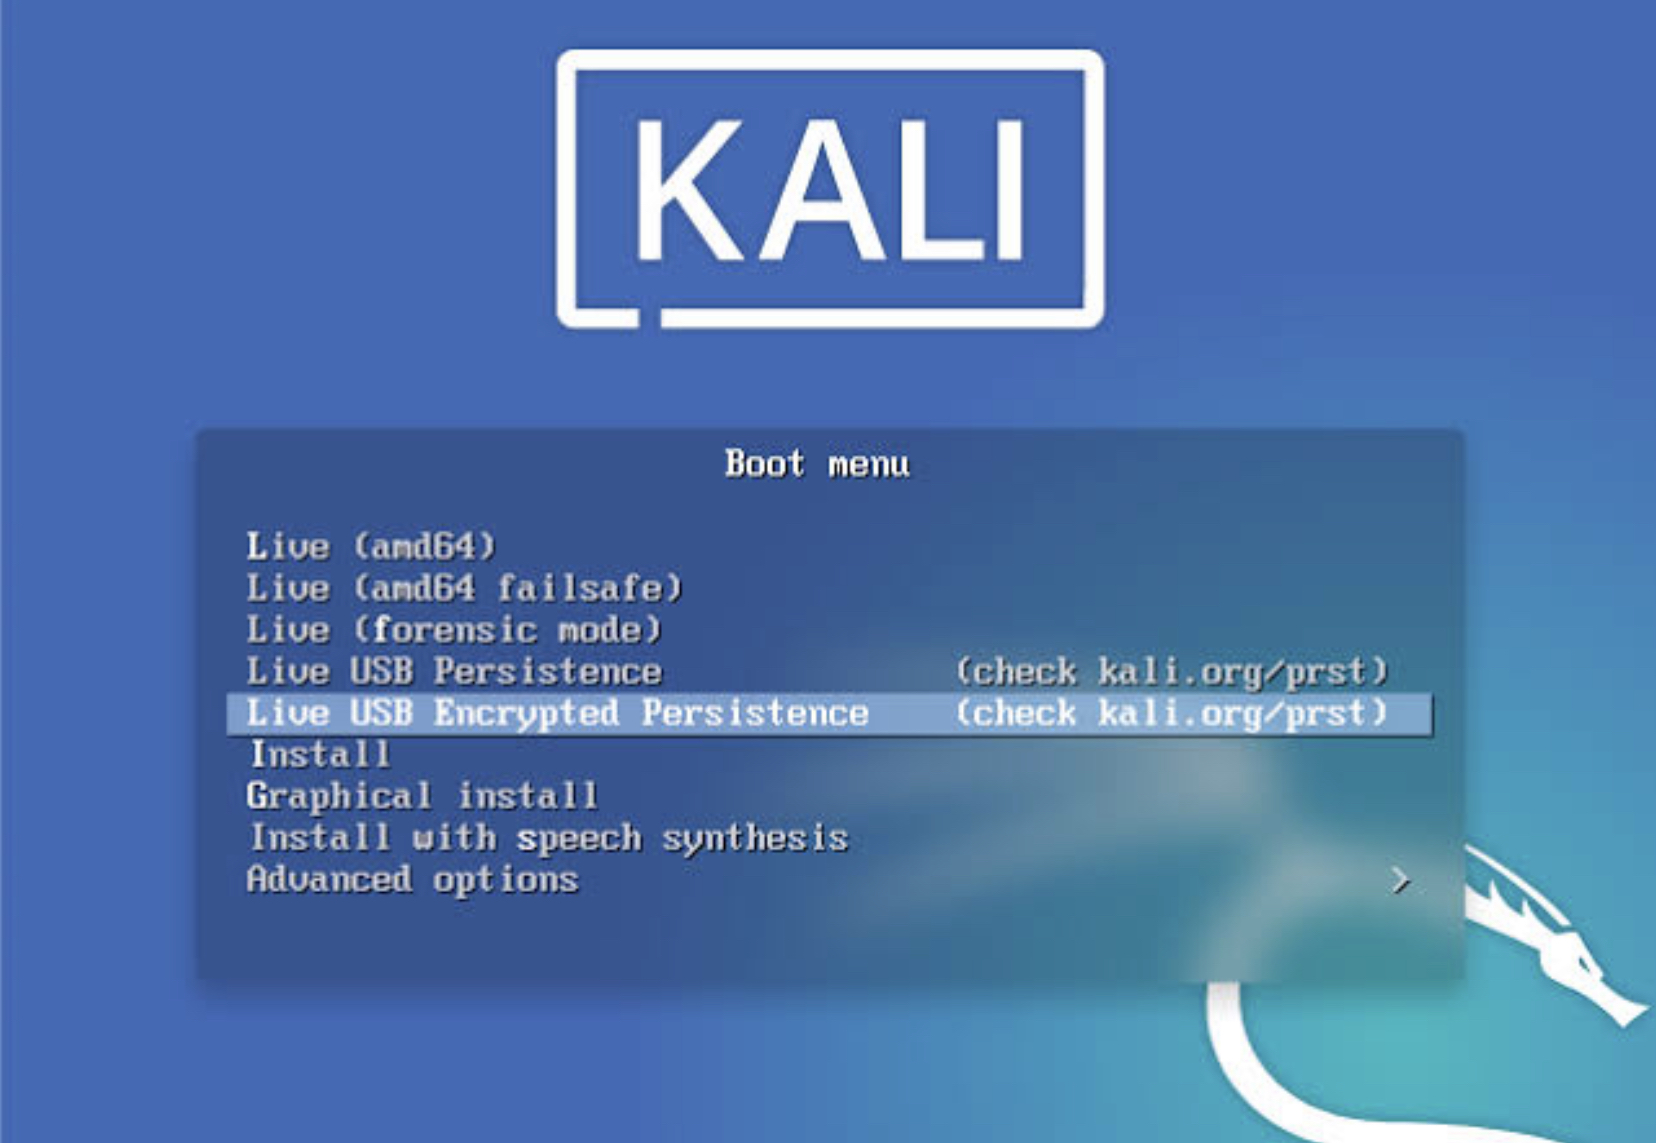
Browse for the downloaded Kali Linux OS image, then select the USB drive after that start Flashing.
Wait for some time after completion your Kali Linux Live USB is ready to be used. You can start using Kali Linux Live but each time you boot your previous changes will be discarded.
So to preserve changes across boots we will create a persistence drive
Log in to any Linux OS keep in mind this LinuxOS is different from the one which we have just created.
Launch disk part
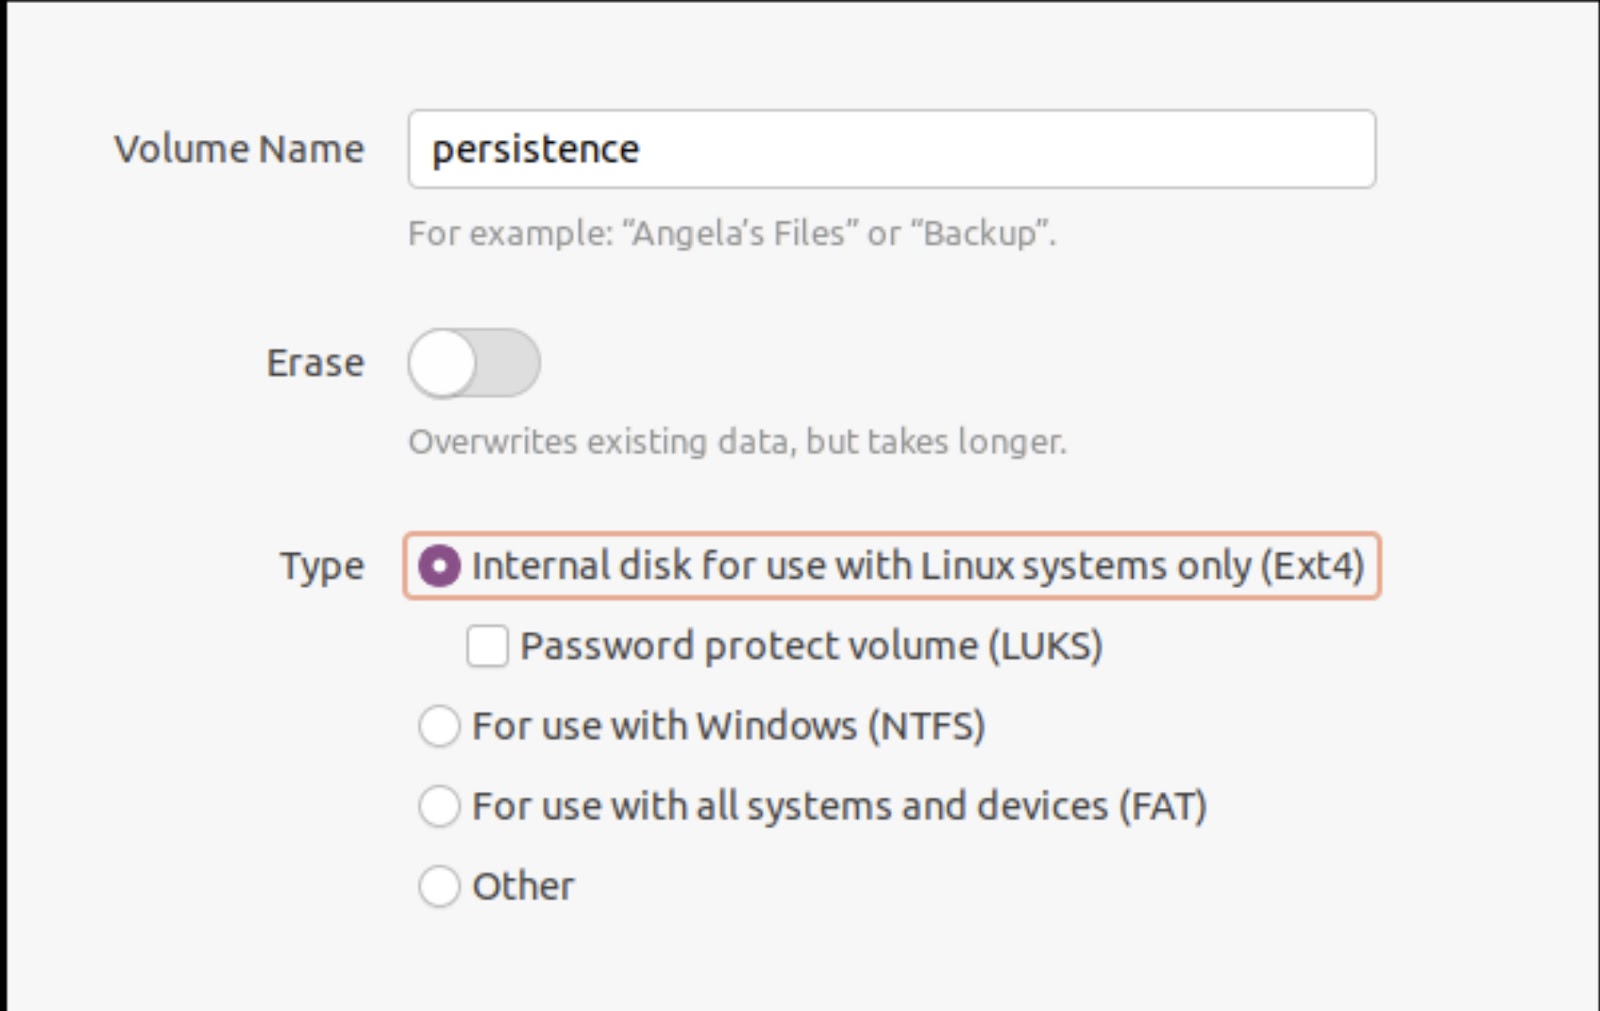
Select Kali Linux Live USB then select free space and click on the “ + “ button to create a new drive
Write volume name persistence and select type ext4 and after completion of task exit disk part utility and launch terminal as a root user
Type the command “fdisk -l”
Then make an ext3 file system and label it persistence
Type following commands
mkfs.ext3 -L persistence /dev/sdb3
e2label /dev/sdb3 persistence
After successfull execution create a mount point and mount the volume
mkdir -p /mnt/my_usb
mount /dev/sdb3 /mnt/my_usb
After that create the configuration file for persistence
echo “/ union” > /mnt/my_usb/persistence.conf
Finally unmount the newly created volume
umount /dev/sdb3
Exit the terminal and Boot from your newly created Kali Linux Live persistence USB.
For any suggestions or questions, feel free to drop them in the comment section below.